Tuesday, 23 October 2018

SonarQube with Jenkins

How to integrate Sonarqube with Jenkins (Windows 7/8 64 bit)_


Many of us are working on automation testing where we need to write thousand lines of code to automate test cases. while writting code, one has to follow the standard. One has to put write logic which helps in optimizing your code and performance. 

Here is tool SonarQube which explains about how to install/configure it for continuous integration and improving code quality.

Main reason of using this is opensource platform continuous inspection of code quality.It helps in various task and provide report on duplicate code, code standard, unit test, code coverage, complex code etc...

Let's go over setting up SonarQube with Jenkins.


Pre-requisite:

1) One needs to have Jenkins server 2.138.1 installed and service up and running.
2) Download SonarQube from web and unpack the zip file and copy that folder anywhere on your system.
3) Let's run
C:\Users\<username>\Downloads\sonarqube-7.3.zip\sonarqube-7.3\bin\windowsx86-64\StartSonar.bat
4) One needs to have Maven project which is commited to respective repository and integrated with Jenkins.
5) Go to settings.xml file where maven is installed.
For e.g.
C:\Users\<Username>\apache-maven-3.3.9\conf\settings.xml


Add following in above file..


<pluginGroups>
<!-- pluginGroup
| Specifies a further group identifier to use for plugin lookup.
<pluginGroup>com.your.plugins</pluginGroup>
-->
<pluginGroup>org.sonarsource.scanner.maven</pluginGroup>
</pluginGroups>
<profile>
<id>sonar</id>
<activation>
<activeByDefault>true</activeByDefault>
</activation>
<properties>
<sonar.host.url>http://<jenkinsServerIP>:9000
</sonar.host.url>
</properties>
</profile>


6) Add the following dependency in pom.xml file of your respective project.

<build>
<finalName>arcVirtualQueuing</finalName>
<plugins>
<plugin>
<groupId>org.sonarsource.scanner.maven</groupId>
<artifactId>sonar-maven-plugin</artifactId>
<version>3.3.0.603</version>
</plugin>
</plugins>
</build> 

Sunday, 21 October 2018

Extent Reporting with Selenium

Selenium reporting using Extent Report and TestNG

Many of us working on automation using Selenium Webdriver to reduce the time and cost and achieve higher percentage of test coverage. Along with this, there needs to have advance reporting which gives us details information of particular test run.


So, Extent report is very high in demand and popular which is being used with Selenium. And we all know, TestNG generates HTML report by default which is not more readable and attractive. We have to put lots of efforts to make it attractive. But this has been provided an ability to implement "IReporter an interface to customize TestNG report.


Extent Report API makes our life easy to generate interactive report with simple configuartion.
Considering you have Maven project created..

Step 1 - Extent Report Maven Dependency :

<dependency>      <groupId>com.aventstack</groupId>      <artifactId>extentreports</artifactId>      <version>3.1.5</version> </dependency>


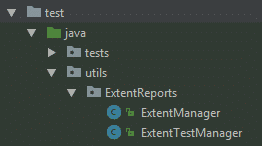
Step 2 - Add extent report classes.


ExtentManager Class:

package utils.ExtentReports; import com.relevantcodes.extentreports.ExtentReports; public class ExtentManager { private static ExtentReports extent; public synchronized static ExtentReports getReporter(){ if(extent == null){ String workingDir = System.getProperty("user.dir"); //Configure HTML report file location extent = new ExtentReports(workingDir+"\\ExtentReports\\ExtentReport.html", true); } return extent; } }

ExtentTestManager Class:

- Here we are going to create extentTestMap will hold the information.

- Instance is created by calling getReporter() method from ExtentManager.

- At StartTest() method, an instance of ExtentTest created and put into extentTestMap with current thread id.

- At EndTest() method, test ends and ExtentTest instance obtained from extentTestMap via current thread id.

- At getTest() method, return ExtentTest instance in extentTestMap by using current thread id.


package utils.ExtentReports; import com.relevantcodes.extentreports.ExtentReports; import com.relevantcodes.extentreports.ExtentTest; import java.util.HashMap; import java.util.Map; public class ExtentTestManager { static Map extentTestMap = new HashMap(); static ExtentReports extent = ExtentManager.getReporter(); public static synchronized ExtentTest getTest() { return (ExtentTest)extentTestMap.get((int) (long) (Thread.currentThread().getId())); } public static synchronized void endTest() { extent.endTest((ExtentTest)extentTestMap.get((int) (long) (Thread.currentThread().getId()))); } public static synchronized ExtentTest startTest(String testName, String desc) { ExtentTest test = extent.startTest(testName, desc); extentTestMap.put((int) (long) (Thread.currentThread().getId()), test); return test; } }


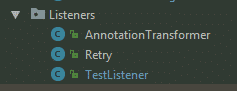
TestListener Class:


package utils.Listeners; import com.relevantcodes.extentreports.LogStatus; import org.openqa.selenium.OutputType; import org.openqa.selenium.TakesScreenshot; import org.openqa.selenium.WebDriver; import org.testng.ITestContext; import org.testng.ITestListener; import org.testng.ITestResult; import tests.BaseTest; import utils.ExtentReports.ExtentManager; import utils.ExtentReports.ExtentTestManager; public class TestListener extends BaseTest implements ITestListener { private static String getTestMethodName(ITestResult iTestResult) { return iTestResult.getMethod().getConstructorOrMethod().getName(); } //Before starting all tests, below method runs. @Override public void onStart(ITestContext iTestContext) { System.out.println("I am in onStart method " + iTestContext.getName()); iTestContext.setAttribute("WebDriver", this.driver); } //After ending all tests, below method runs. @Override public void onFinish(ITestContext iTestContext) { System.out.println("I am in onFinish method " + iTestContext.getName()); //Do tier down operations for extentreports reporting! ExtentTestManager.endTest(); ExtentManager.getReporter().flush(); } @Override public void onTestStart(ITestResult iTestResult) { System.out.println("I am in onTestStart method " + getTestMethodName(iTestResult) + " start"); //Start operation for extentreports. ExtentTestManager.startTest(iTestResult.getMethod().getMethodName(),""); } @Override public void onTestSuccess(ITestResult iTestResult) { System.out.println("I am in onTestSuccess method " + getTestMethodName(iTestResult) + " succeed"); //Extentreports log operation for passed tests. ExtentTestManager.getTest().log(LogStatus.PASS, "Test passed"); } @Override public void onTestFailure(ITestResult iTestResult) { System.out.println("I am in onTestFailure method " + getTestMethodName(iTestResult) + " failed"); //Get driver from BaseTest and assign to local webdriver variable. Object testClass = iTestResult.getInstance(); WebDriver webDriver = ((BaseTest) testClass).getDriver(); //Take base64Screenshot screenshot. String base64Screenshot = "data:image/png;base64,"+((TakesScreenshot)webDriver). getScreenshotAs(OutputType.BASE64); //Extentreports log and screenshot operations for failed tests. ExtentTestManager.getTest().log(LogStatus.FAIL,"Test Failed", ExtentTestManager.getTest().addBase64ScreenShot(base64Screenshot)); } @Override public void onTestSkipped(ITestResult iTestResult) { System.out.println("I am in onTestSkipped method "+ getTestMethodName(iTestResult) + " skipped"); //Extentreports log operation for skipped tests. ExtentTestManager.getTest().log(LogStatus.SKIP, "Test Skipped"); } @Override public void onTestFailedButWithinSuccessPercentage(ITestResult iTestResult) { System.out.println("Test failed but it is in defined success ratio " + getTestMethodName(iTestResult)); }

AnnotationTransformer Class:

package utils.Listeners; import org.testng.IAnnotationTransformer; import org.testng.annotations.ITestAnnotation; import java.lang.reflect.Constructor; import java.lang.reflect.Method; public class AnnotationTransformer implements IAnnotationTransformer { @Override public void transform(ITestAnnotation annotation, Class testClass, Constructor testConstructor, Method testMethod) { annotation.setRetryAnalyzer(Retry.class); } } 


Retry Class:

package utils.Listeners; import com.relevantcodes.extentreports.LogStatus; import org.openqa.selenium.OutputType; import org.openqa.selenium.TakesScreenshot; import org.openqa.selenium.WebDriver; import org.testng.IRetryAnalyzer; import org.testng.ITestResult; import tests.BaseTest; import utils.ExtentReports.ExtentTestManager; public class Retry implements IRetryAnalyzer { private int count = 0; private static int maxTry = 1; //Run the failed test 2 times @Override public boolean retry(ITestResult iTestResult) { if (!iTestResult.isSuccess()) { if (count < maxTry) { count++; iTestResult.setStatus(ITestResult.FAILURE); extendReportsFailOperations(iTestResult); return true; } } else { iTestResult.setStatus(ITestResult.SUCCESS); } return false; } public void extendReportsFailOperations (ITestResult iTestResult) { Object testClass = iTestResult.getInstance(); WebDriver webDriver = ((BaseTest) testClass).getDriver(); String base64Screenshot = "data:image/png;base64,"+((TakesScreenshot)webDriver).getScreenshotAs(OutputType.BASE64); ExtentTestManager.getTest().log(LogStatus.FAIL,"Test Failed", ExtentTestManager.getTest().addBase64ScreenShot(base64Screenshot)); }


Step 4 - Add description

@Test (priority=1, description="Scenario of providing empty username and password")
public void invliadTest()
{
ExtentTestManager.getTest().setDescription("Scenario of providing empty username and password");


Step 5 - Adding listener to TestNG.xml file

<?xml version="1.0" encoding="UTF-8"?> <!DOCTYPE suite SYSTEM "http://testng.org/testng-1.0.dtd"> <suite name="N11 Test Suite" > <listeners> <listener class-name="utils.Listeners.TestListener"/> <listener class-name="utils.Listeners.AnnotationTransformer"/> </listeners> <test name="LoginTest"> <classes> <class name="tests.LoginTests"/> </classes> </test> </suite>


Step 6 - BaseTest Class

package tests; import org.openqa.selenium.WebDriver; import org.openqa.selenium.chrome.ChromeDriver; import org.openqa.selenium.support.ui.WebDriverWait; import org.testng.annotations.AfterClass; import org.testng.annotations.AfterMethod; import org.testng.annotations.BeforeClass; import org.testng.annotations.BeforeMethod; public class BaseTest { public WebDriver driver; public WebDriverWait wait; public WebDriver getDriver() { return driver; } @BeforeClass public void setup () { driver = new ChromeDriver(); wait = new WebDriverWait(driver,15); driver.manage().window().maximize(); } @AfterClass public void teardown () { driver.quit(); } }


Step 7 - Test Class

package tests; import org.testng.annotations.Test; import pages.HomePage; import pages.LoginPage; import utils.ExtentReports.ExtentTestManager; public class LoginTests extends BaseTest { @Test (priority = 0, description="Scenario of providing empty username and password") public void invalidLoginTest_InvalidUserNameInvalidPassword () throws InterruptedException { //ExtentReports Description ExtentTestManager.getTest().setDescription("Scenario of providing empty username and password"); HomePage homePage = new HomePage(driver,wait); LoginPage loginPage = new LoginPage(driver,wait); homePage.goToN11(); //Go to LoginPage homePage.goToLoginPage(); //Login to N11 loginPage.loginToN11("onur@swtestacademy.com", "11223344"); //*************ASSERTIONS*********************** Thread.sleep(500); loginPage.verifyLoginPassword(("password")); } @Test (priority = 1, description="Scenario of providing empty username and password") public void invalidLoginTest_EmptyUserEmptyPassword () throws InterruptedException { //ExtentReports Description ExtentTestManager.getTest().setDescription("Scenario of providing empty username and password"); //*************PAGE INSTANTIATIONS************* HomePage homePage = new HomePage(driver,wait); LoginPage loginPage = new LoginPage(driver,wait); //*************PAGE METHODS******************** homePage.goToN11(); homePage.goToLoginPage(); loginPage.loginToN11("",""); //*************ASSERTIONS*********************** Thread.sleep(500); loginPage.verifyLoginUserName("username"); loginPage.verifyLoginPassword("password"); } }


After all this, run the test and you will see html file generated under ExtentReport folder as shown below...or under test-output accordingly. When you open the result you will see test result as shown below:


--------------------------------------------------------------------

Saturday, 20 October 2018

Selennium With BrowserStack

Compatibility Testing Using BrowserStack & Selenium – TestNG


Image result for multiple platform testing

Compatibility Testing is a type of Software testing to check whether your software is capable of running on different hardware, operating systems, applications , network environments or Mobile devices.
Compatibility Testing is a type of the Non-functional testing
BrowserStack allow us to make automation testing on different platforms at once place.
You need to set few parameters browsers and platforms. There are few steps to be followed to integrate Selenium with BrowserStack.
Step1: Sign Up for BrowserStack account
Step2: Get your username and access key.
Step3: Create your test script using TestNG
Step4: Create your testng.xml file to run your test in parallel
Step5: Execute testng.xml
Step6: To view your result, login and click on automate link, so that you can view your project result.
Here is sample code that I am providing written using TestNG.

public class BSTC {
private WebDriver driver;
public static final String USERNAME = “<usename>”;
public static final String AUTOMATE_KEY = “<accesskey>”;
public static final String URL = “http://browserstack.com; + USERNAME + “:” + AUTOMATE_KEY
+ “@hub.browserstack.com/wd/hub”;
@BeforeTest
@Parameters(value = { “browser”, “version”, “platform” })
public void setUp(String browser, String version, String platform) throws exception{
DesiredCapabilities capability = new DesiredCapabilities();
capability.setCapability(“platform”, platform);
capability.setCapability(“browserName”, browser);
capability.setCapability(“browserVersion”, version)
capability.setCapability(“project”, “TestProject”);
capability.setCapability(“build”, “3.03”);
driver = new RemoteWebDriver(new URL(URL), capability);
}
@Test(priority = 1)
public void TC01() throws Exception {
driver.get(“http://www.google.com;);
Assert.assertEquals(“Google”, driver.getTitle());
WebElement element = driver.findElement(By.name(“q”));
element.sendKeys(“BrowserStack”);
element.sendKeys(Keys.ENTER);
}
@Test(priority = 2)
public void TC02() {
driver.get(“http://seleniumhq.org;);
Assert.assertEquals(“Selenium – Web Browser Automation”,
driver.getTitle());
}
@AfterMethod
public void takeScreenShot(ITestResult result)
{
if (result.getStatus() == ITestResult.FAILURE)
      {
           driver = new Augmenter().augment(driver);
           File srcFile = ((TakesScreenshot) driver).getScreenshotAs(OutputType.FILE);
try {
           FileUtils.copyFile(srcFile, new File(“D:\\Screenshot”+ result.getParameters().toString() + “.png”));
} catch (IOException e)
{
          e.printStackTrace();
}
}
}
@AfterTest
public void tearDown() throws Exception {
driver.quit();
}
}
Now setup your configuration in xml file. Copy the below code.
<suite thread-count=”3″ name=”Suite” parallel=”tests”>
<test name=”FirstTest”>
          <parameter name=”browser” value=”firefox” />
          <parameter name=”version” value=”42″ />
          <parameter name=”platform” value=”Windows” />
          <classes>
                    <class name=”package1.BSTC” />
          </classes>
</test>
<test name=”SecondTest”>
          <parameter name=”browser” value=”safari” />
          <parameter name=”version” value=”7.0″ />
          <parameter name=”platform” value=”MAC” />
          <classes>
                     <class name=”package1.BSTC” />
          </classes>
</test>
<test name=”ThirdTest”>
          <parameter name=”browser” value=”Internet Explorer” />
          <parameter name=”version” value=”10″ />
          <parameter name=”platform” value=”Windows” />
          <classes>
                     <class name=”package1.BSTC” />
          </classes>
</test>
</suite>

This is how, we can execute same test case in multiple environment. Just login and click on 'Automate' link and you will see your result.
All The Best... 

Select Language